VELoQ for OBS
Setup & Audio Mixer Guide
Everything in the VELoQ dock and its Audio Mixer, in plain words. If you’ve opened the audio options and closed them again, this page is for you. You never have to touch them: the defaults are safe. But once you know what they do, they take about a minute.
Written for VELoQ 0.2.28 · Last updated October 15, 2026
Start here
What VELoQ is, and why it’s better
VELoQ is Velora’s own plugin for OBS Studio. It adds a small panel (a dock) to OBS with one big button: GO LIVE ON VELORA. No stream keys, no server URLs. You sign in once with your Velora account and go live.
- ✓Near-instant. VELoQ is our own way of sending video, built for speed: your viewers see you in well under a second, so chat and stream stay in step.
- ✓Your audio stays separate. Instead of one baked-together sound, your mic, game and music can each travel on their own track. Viewers can turn your music down without turning you down.
- ✓VODs you can keep. Music you can play live but can’t keep in recordings can be left out of your VOD automatically, while viewers still hear it live.
- ✓Ready to edit. With Editor+, every source can be recorded as its own file (a “stem”), so you can re-balance audio after the stream.
Good to know
What it’s called inside OBS
The plugin shows up under a few different names depending on where you look. They are all the same plugin, so don’t worry if the name you see doesn’t match the one you expected:
- OBS Docks menu and the dock’s title bar
- VELoQ Streamer for Velora.tv (this is the one you need)
- The settings window
- VELoQ Streamer for Velora.tv — Settings
- OBS Settings → Hotkeys
- VELoQ: Start stream, VELoQ: Stop stream, VELoQ: Toggle stream (version 0.2.28 and older say Velora Live: Start stream and so on; your key bindings carry over when you update)
- Update notice in the dock
- “VELoQ 0.x is available” (version 0.2.28 and older say “Velora Live 0.x is available”)
- Installer files
- VeloraLive (for example
VeloraLive-Setup) - The Velora Tools page
- VELoQ Streamer / VELoQ by Velora
“Velora Live” is the plugin’s older name. Versions after 0.2.28 say “VELoQ” everywhere you see it inside OBS; only the installer file names still start with VeloraLive.
Step 1
Install it
Before you start: you need OBS Studio 30 or newer (OBS 30 is where the Docks menu got its own spot in the top menu bar). On a Mac you need macOS 12 or newer; Apple silicon and Intel Macs both work. Get the download for your system from the VELoQ download card. The page picks your system for you.
Windows
- 1Close OBS if it’s open.
- 2Run the
VeloraLive-Setupfile you downloaded. - 3It finds OBS for you, including portable copies. If your OBS lives somewhere unusual, use Browse… to point at it.
- 4If Windows or your antivirus blocks the installer, use the Install it manually instead link under the Windows download button.
macOS
- 1Close OBS if it’s open.
- 2Open the
VeloraLive.pkgfile and follow the installer. - 3If macOS warns about the package, right-click it and choose Open. It’s signed and notarized by Apple, but macOS sometimes asks anyway the first time.
Linux
- 1Pick the build that matches how you installed OBS. Got OBS from your Software Center, Discover or Flathub? Use Flatpak. Otherwise use Universal or .deb. Not sure? Run
flatpak list | grep obs. If OBS shows up, you’re on Flatpak. - 2Close OBS if it’s open.
- 3Universal (.tar.gz): extract it anywhere, open the folder in a terminal and run
./install.sh, then follow the prompts. - 4.deb: install it, then run
velora-liveonce in a terminal. - 5Flatpak: run
flatpak install --user VeloraLive-flatpak-*.flatpakon the file you downloaded.
Step 2
Turn on the dock and sign in
- 1Open OBS.
- 2In the menu bar at the top of OBS, click Docks.
- 3Click VELoQ Streamer for Velora.tv so it has a check mark. The dock appears. You can drag it anywhere in the OBS window, or let it float.
- 4Press SIGN IN TO VELORA. The settings window opens on Account; press Sign in to Velora and finish signing in in your browser.
- 5Back in OBS, the button now reads GO LIVE ON VELORA. Press it when you’re ready. That’s it.
Can’t find it in the Docks menu? The plugin didn’t load. Check that OBS is version 30 or newer (Help → About), close OBS fully and run the installer again. On Linux, make sure the build matches how you installed OBS (Flatpak vs. the others).
Where’s the X? The dock has no close button on purpose, so you can’t close it by accident in the middle of a stream. To hide it, uncheck it in the Docks menu.
The short version
Quick start: most people only need these 3
Open the mixer from the dock: ⚙ Settings → Audio Mixer. Every OBS source that makes sound has one line. Then:
- 1
“Who hears it” dropdown: leave your mic and game on Viewers + VOD.
That’s already the default for microphones, desktop audio and game capture. It means viewers hear it, get their own volume slider for it, and it’s in your VOD.
- 2
The VOD badge: make copyrighted music Live only.
Each line has a little badge that says In VOD or Live only. Click it to switch. Live only means viewers still hear it live, but your VOD leaves it out. Sources with music-sounding names (Spotify, Playlist, BGM and so on) already start as Live only.
- 3
Press Save Changes, then go live.
Dropdown changes wait for Save Changes (the summary says “Unsaved changes” until you do). Badge clicks save on their own. Changes to where audio goes apply the next time you press Go Live.
Volume and mute stay in OBS. VELoQ follows OBS’s own audio mixer: your volume faders, mute buttons and audio filters all carry over. Set your levels in OBS like you always have.
The idea behind it
How VELoQ sends your audio
Every sound source answers two questions: who hears it, and is it in your VOD. Put together, that gives five choices. This table is the whole mixer in one picture:
| Choice in the dropdown | Viewers hear it | Own slider | In the VOD | Good for |
|---|---|---|---|---|
| Viewers + VODbadge: In VOD | Yes | Yes | Yes | Your mic, your game. The normal choice for anything important. |
| Viewers, not in VODbadge: Live only | Yes | Yes | No | Music you play live but can’t keep in recordings, when you want viewers to be able to turn it down. |
| No slider, in VODbadge: In VOD | Yes | No | Yes | Alerts, sound effects, videos. Heard normally, without cluttering the viewer’s mixer. |
| No slider, not in VODbadge: Live only | Yes | No | No | Background music you can’t keep in recordings and don’t need a slider for. |
| Not sentbadge: Not sent | No | No | No | Things only you should hear: a test tone, a private call, a source you use for monitoring. |
Viewers + VOD
badge: In VOD
- Heard
- Yes
- Slider
- Yes
- In VOD
- Yes
Your mic, your game. The normal choice for anything important.
Viewers, not in VOD
badge: Live only
- Heard
- Yes
- Slider
- Yes
- In VOD
- No
Music you play live but can’t keep in recordings, when you want viewers to be able to turn it down.
No slider, in VOD
badge: In VOD
- Heard
- Yes
- Slider
- No
- In VOD
- Yes
Alerts, sound effects, videos. Heard normally, without cluttering the viewer’s mixer.
No slider, not in VOD
badge: Live only
- Heard
- Yes
- Slider
- No
- In VOD
- No
Background music you can’t keep in recordings and don’t need a slider for.
Not sent
badge: Not sent
- Heard
- No
- Slider
- No
- In VOD
- No
Things only you should hear: a test tone, a private call, a source you use for monitoring.
What “a slider” means
On Velora, viewers can open a mixer under your stream and set their own volume for each of your sources. A source with its own slider gets its own line there. Viewers who never open that mixer just hear your normal stream mix, the same sound OBS would send anywhere else.
- You get 8 viewer sliders. The summary at the top of the mixer counts them, for example “7 of 8 viewer sliders used”.
- Anything past 8 still gets heard, but shares one extra slider called Other. Drag the sources you care about higher in the list, or combine a few into a send (see Groups below), to give them their own.
- “No slider” sources are still heard by everyone; they’re mixed together quietly in the background and don’t use up any of your 8.
›The technical detail (for the curious)
- Every audio track VELoQ sends is Opus, 48 kHz stereo, 96 kbps.
- The main mix is the sound viewers hear by default. It follows OBS’s Track 1, with any “Not sent” sources taken out.
- Each own-slider source (up to 8, sends count as one) goes out as its own track. “No slider” sources are mixed into two background tracks: one kept in the VOD, one left out. Past 8, sources share an “Other” track (two of them if some are in the VOD and some aren’t, so the VOD choice is always kept).
- While you’re live, VELoQ borrows OBS’s free audio tracks 2 to 6 to keep own-slider sources cleanly separated, and puts your track settings back when you stop. It never takes a track that another output is using (Aitum Vertical, a multitrack recording and so on). If you have “Not sent” sources, the main mix is built on a spare track so your own Track 1 is never changed.
- Your mixer settings are saved per OBS profile, and remembered by source, so renaming a source in OBS keeps its settings.
Reference
The Audio Mixer, control by control
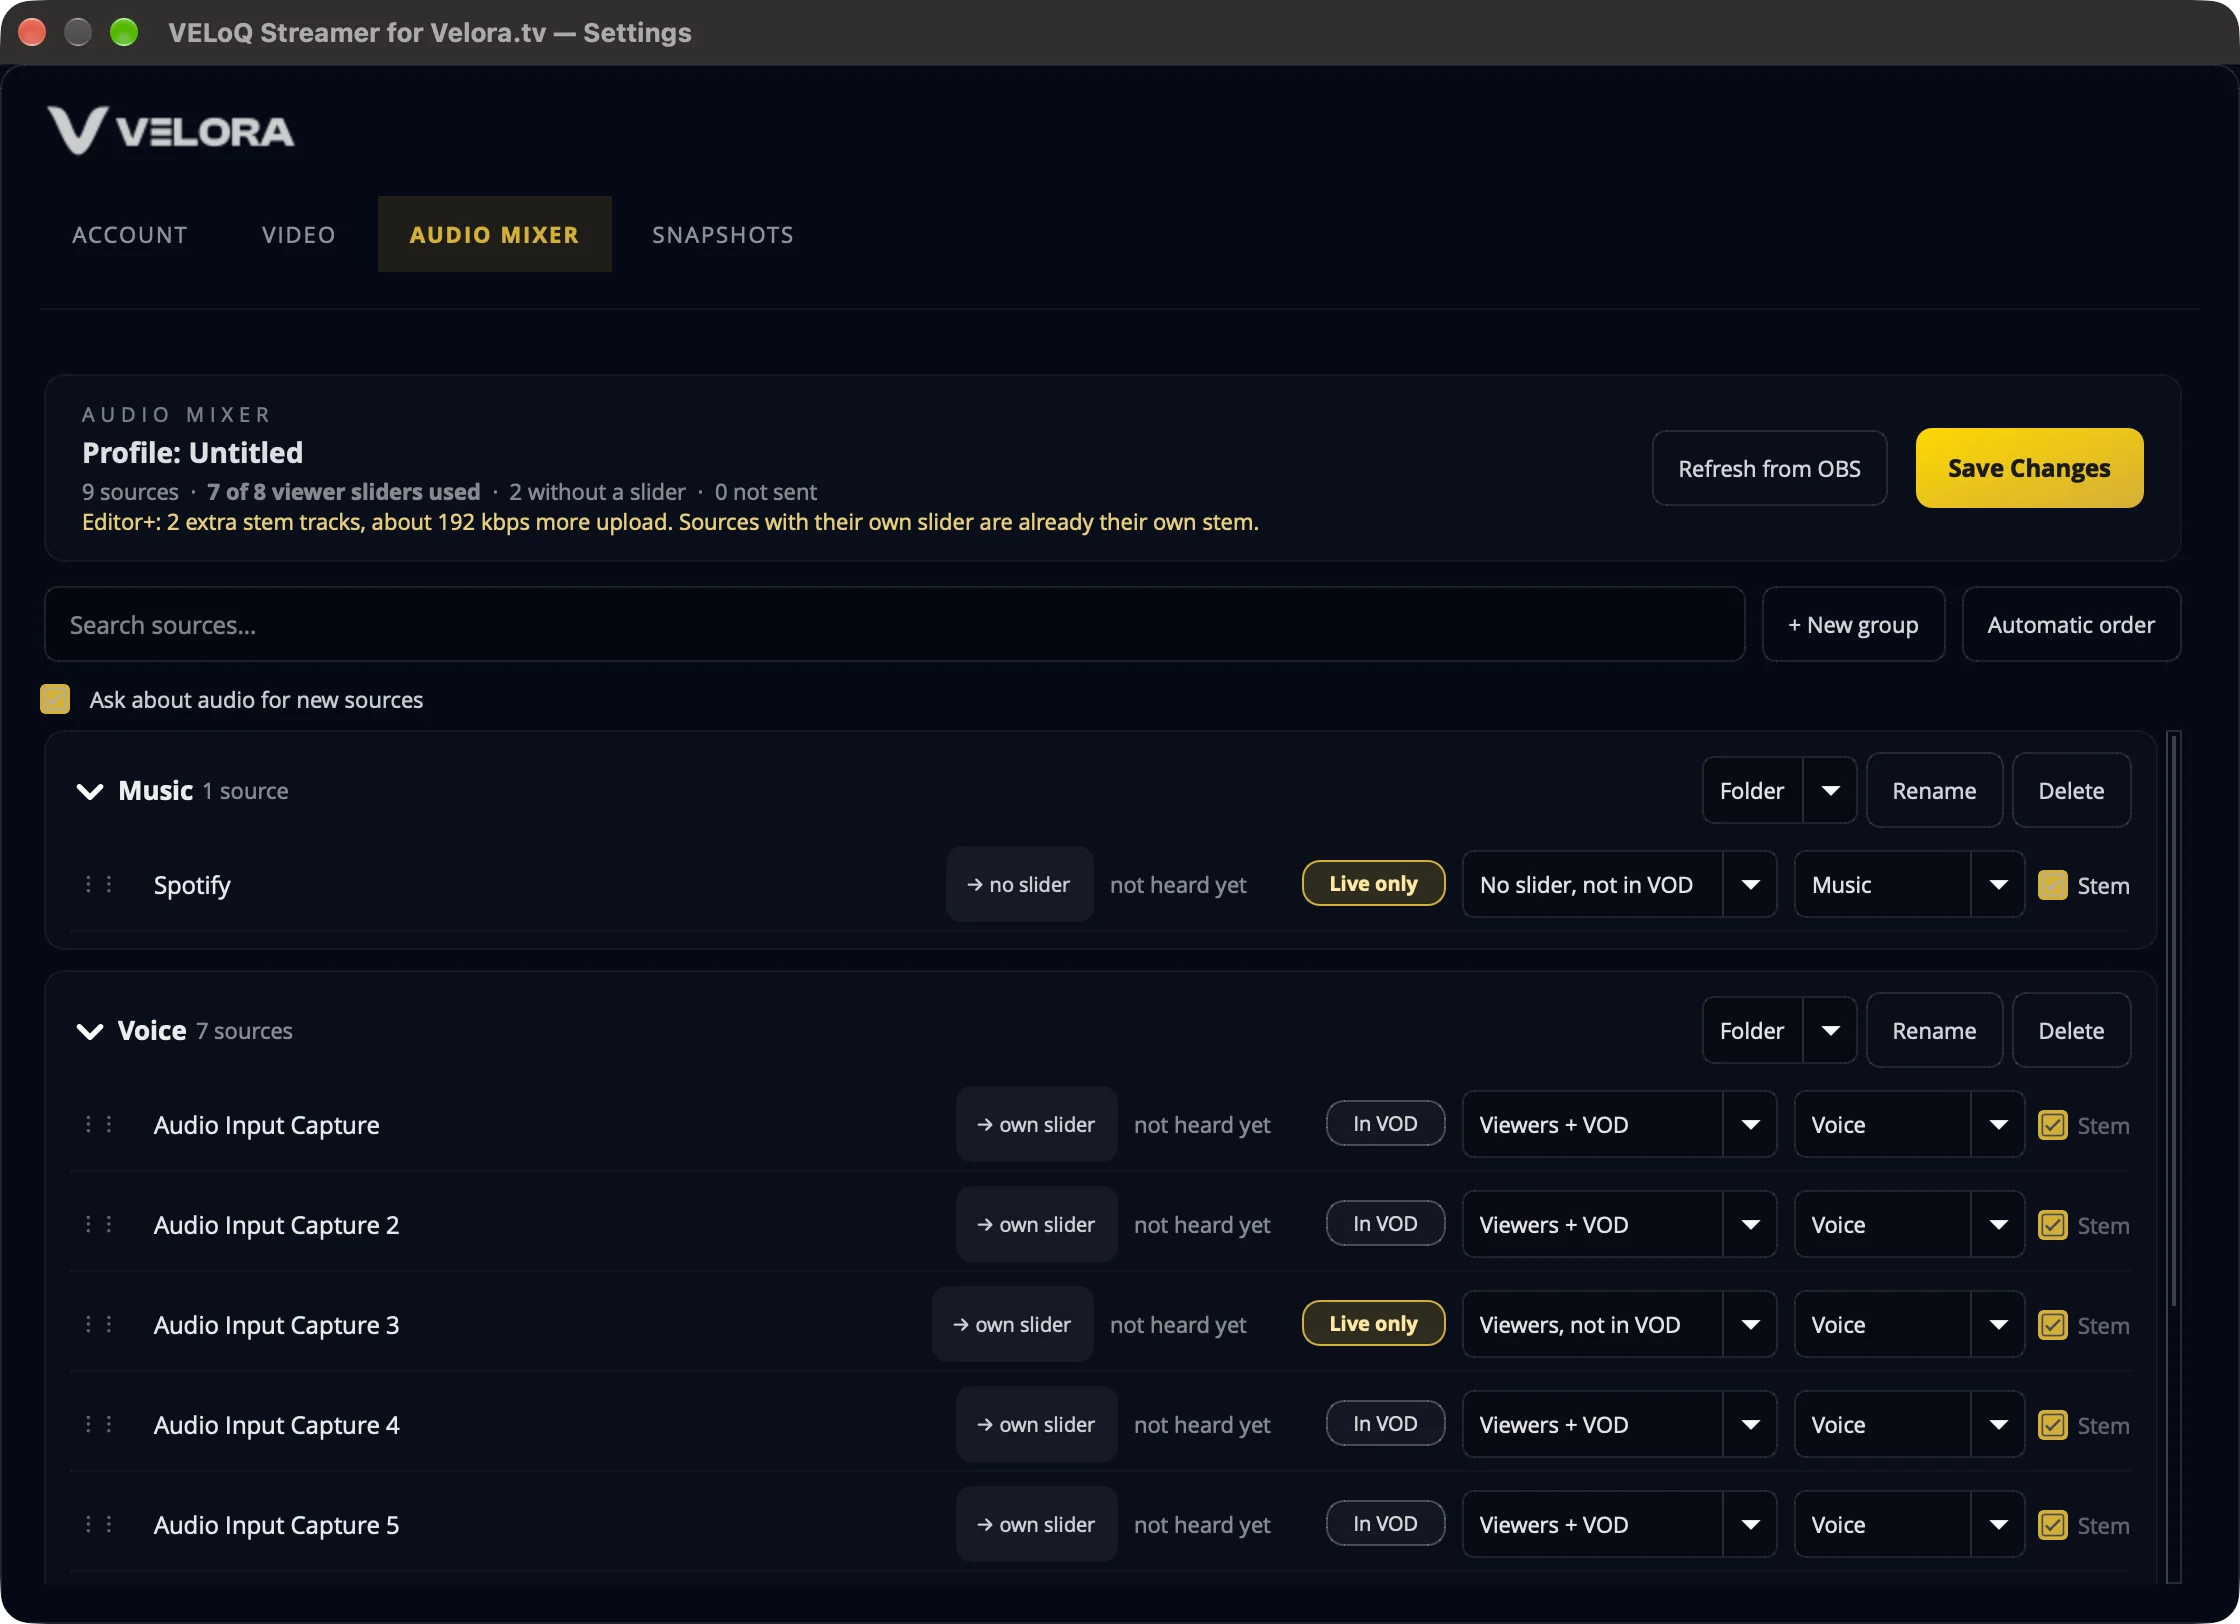
Each source’s line
Left to right. When the window is narrow, some parts shorten or hide; hover anything for its full text.
⋮⋮ Drag handle
Drag a line up or down to reorder, or onto a group to move it in. Order matters: the first 8 sources (top to bottom) are the ones that get their own viewer slider.
- Default
- Automatic order: microphones first, then capture & game, then browser & overlays, then media files; the most recently heard first within each.
- Change it when
- A source you care about ended up sharing the “Other” slider.
Name
The name viewers see on the slider. Click it to type a friendlier one (“Mic” instead of “Audio Input Capture 3”). Hover to see the original OBS name.
- Default
- The source’s name in OBS.
- Change it when
- Always worth it for anything with its own slider. Name changes work even while you’re live and show up right away.
Route chip (→ own slider)
Read-only. Tells you where this source actually ends up: own slider, no slider, send: Name, Other (shares the overflow slider), not sent, or silent, skipped (OBS itself can’t hear it; hover for why).
Technical: A live preview of the same routing Go Live will build, in the same order.
“heard …” (heard 2 min ago, not heard yet)
When this source last made a sound while the mixer was open. It only helps sort the list; it never hides or mutes anything.
Technical: Measured by OBS’s own level meter; anything louder than −60 dBFS counts as “heard”.
VOD badge (In VOD / Live only / Not sent)
The quickest switch on the page. Click it to flip between In VOD and Live only. It keeps the slider choice as it is, and saves immediately (no Save Changes needed). “Not sent” can’t be clicked; use the dropdown instead.
- Default
- In VOD, except music-sounding names, which start Live only.
- Change it when
- You play music (or anything else) you’re allowed to stream but not to keep in recordings.
Technical: For a source inside a send, the badge flips the whole send. Locked while you’re live; applies on your next Go Live.
“Who hears it” dropdown
The five choices from the table above: Viewers + VOD, Viewers, not in VOD, No slider, in VOD, No slider, not in VOD, Not sent. On a narrow window it shows short words (Slider + VOD, Slider, live, No slider + VOD, No slider, live).
- Default
- Mics, desktop/app audio, game capture, capture cards and cameras: Viewers + VOD. Music apps by name (Spotify, Apple Music, foobar…): No slider, not in VOD. Other music-sounding names: their slider choice, but Live only. Everything else (browser sources, media files, window captures): No slider, in VOD. New sources are never set to Not sent; only you can choose that.
- Change it when
- You want a source to have (or not have) its own slider, or never to leave your computer.
Technical: Needs Save Changes. Locked while you’re live; applies on your next Go Live.
Group dropdown
Puts the source in a group, or No group. Pick New group… to make one. Groups marked “(send)” mix their sources into one slider.
- Default
- Mics and voice apps (Discord, TeamSpeak, Mumble) go in Voice; desktop and game audio in Game; music apps in Music; alerts and Streamlabs/StreamElements in Alerts. Everything else: No group.
- Change it when
- You want to tidy things up, or combine several sources into one slider with a send.
Stem checkbox (Editor+ only)
Records this source as its own separate audio file for editing later, even if viewers hear it mixed with others. Sources with their own slider are already their own file, so for them it’s always on and greyed out.
- Default
- On for every source that’s sent.
- Change it when
- Turn it off for sources you’ll never want to edit separately, to save upload. Each extra stem is about 96 kbps; the summary line adds up the total.
Groups: Folder or Send
A group is a box of sources with a header. Each group has a Folder / Send dropdown, and that one choice matters:
Folder (the default)
Just for tidiness. Every source keeps its own setting and its own slider; viewers see them together under the group’s name.
Send
Mixes all its sources into one slider and one track, with one VOD setting for the whole group (Viewers + VOD or Viewers, not in VOD, in a second dropdown). Uses only one of your 8 sliders. Great for five alert sounds that should behave as one.
Collapse arrow
Folds the group closed or open. Only changes what you see.
Rename
Changes the group’s name (and the name viewers see on a send’s slider).
Delete
Removes the group only. Its sources go back to their normal sections with their settings intact.
Dropping onto a section
Dragging a source onto one of the plain sections (below the groups) takes it out of its group.
Below the groups, ungrouped sources sit in four automatic sections: Microphones & audio, Capture & game, Browser & overlays and Media files. The section is picked by the kind of source; you don’t set it.
The top of the tab
Profile: Your OBS profile
Which OBS profile these settings belong to. Switch profiles in OBS and you get that profile’s mixer.
The summary line
A count of where everything goes: sources, viewer sliders used (out of 8), how many are in sends, how many share “Other”, how many have no slider, and how many aren’t sent. Below it you may see the Editor+ stem total, “Unsaved changes”, or a note that some OBS tracks are being left alone because another output uses them.
Refresh from OBS
Re-reads your sources from OBS (use it after adding or removing sources). Careful: it reloads your saved settings, so anything you haven’t saved yet is thrown away.
Save Changes
Saves everything on the tab and keeps a snapshot of it (see Snapshots). While you’re live, new names apply right away; everything about where audio goes waits for your next Go Live.
Search sources…
Filters the list by name. Handy with a big scene collection.
+ New group
Makes an empty group (a Folder to start). Drag sources into it.
Automatic order
Forgets every drag you’ve made and puts things back in the automatic order: mics, then capture & game, browser, media files; recently heard first.
- Change it when
- Your list order has become a mess. Remember to Save Changes after.
☑ Ask about audio for new sources
When on, adding a sound source in OBS pops up a small card in the dock asking who hears it and whether it’s in the VOD (see below).
- Default
- On.
- Change it when
- Turn off if you add sources often and the card gets in your way. Turning it off doesn’t change any source.
Messages you might see on the tab
“N inputs aren’t being sent to Velora”
An older version of the plugin left some microphone and audio inputs out by default. If you see this, viewers haven’t been hearing them. Send them fixes it; Keep them out keeps them off on purpose. Either way the message goes away.
“N media files played with no audio track and aren’t listed”
Videos that turned out to have no sound are hidden to keep the list short. Show brings them back. This is learned by watching them play, so a silent clip stays listed until it has played once.
“You’re live: names apply now; routing applies on your next Go Live.”
While you’re streaming, the dropdowns, badges, groups and Stem boxes are locked. Names still work.
The new-source card (in the dock)
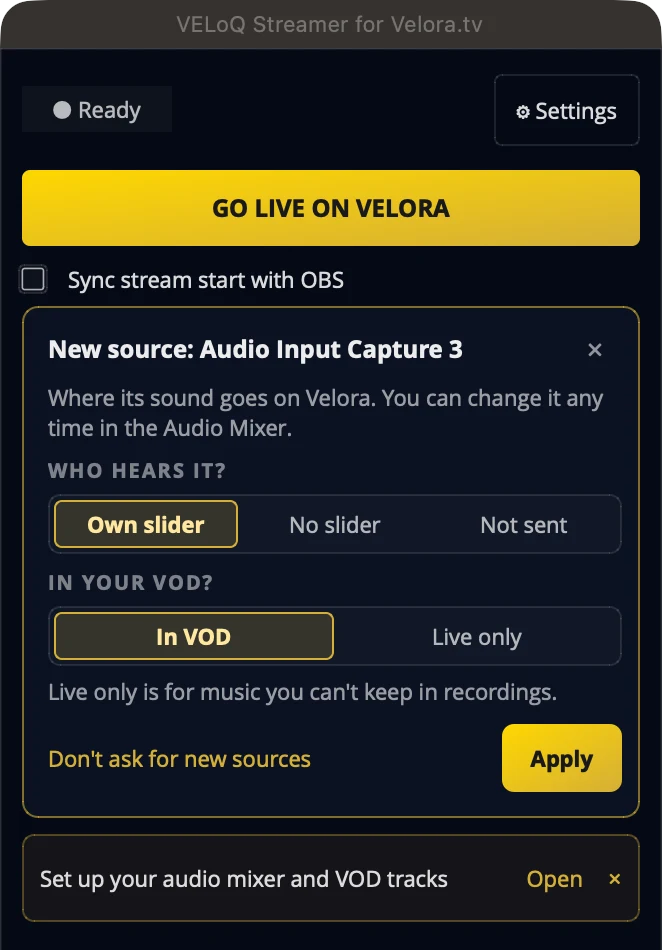
When you add a source with sound through OBS’s + (Add Source) and you’re signed in, the dock shows a card titled New source: its name with the same two questions:
WHO HEARS IT? Own slider No slider Not sent
Whether viewers get a slider for it, hear it without one, or never get it at all.
- Default
- The same automatic default the mixer would pick.
IN YOUR VOD? In VOD Live only
Whether it stays in your recording. Greyed out for Not sent (it isn’t in anything). If the source is in a send, the send decides both, and the card says so.
- Default
- In VOD, unless the name sounds like music.
Apply
Saves your answer right away and highlights the source in the Audio Mixer if it’s open.
× (Keep it as it is)
Closes the card and keeps the default it showed. Leaving the card alone for 45 seconds does the same.
Don’t ask for new sources
Stops the cards. Turn them back on with the checkbox on the Audio Mixer tab.
Audio Mixer link
Opens the mixer at this source’s line.
It only asks about sources you add. Loading a scene collection, duplicating or pasting a source, or another plugin making one won’t trigger it.
Reference
The dock and the other tabs
The dock
Status pill
● Ready signed in and ready. ● Connecting. ● Live with a timer next to it. ● Live · dropping frames your computer or connection is struggling. ● Connection lost. ● Encoder couldn’t start OBS’s video encoder refused to start (your connection is fine). ● Not signed in.
The big button
SIGN IN TO VELORA → GO LIVE ON VELORA → CONNECTING… → END STREAM (red). If something fails it says TRY AGAIN; if the connection drops it shows RECONNECTING… while it gets you back.
⚙ Settings
Opens the settings window on the Account tab. The tabs are Account, Video, Audio Mixer and Snapshots.
☐ Sync stream start with OBS
When ticked, OBS’s own Start Streaming button also takes you live on Velora, and stopping OBS’s stream ends Velora’s too. One button for everything.
- Default
- Off: the dock’s button starts and stops Velora on its own.
- Change it when
- You multistream to other platforms from OBS and want one button. If the older Velora.tv Streamer (WHIP) plugin is also set to start with OBS, the dock tells you VELoQ takes priority, so you never go live twice.
“Set up your audio mixer and VOD tracks” Open ×
A one-time reminder. Open goes to the Audio Mixer; × hides it for good. It also disappears once you’ve opened the mixer.
Update banner
Gold when a newer version is out (with a Get it link), red when your version is too old to keep working well. It never stops you from going live.
Version (VELoQ v…)
At the bottom of the dock, next to the Help link: the version you have installed. Click it to copy it for a support ticket. Versions after 0.2.28 only.
Hotkeys
In OBS Settings → Hotkeys, look for VELoQ: Start stream, VELoQ: Stop stream and VELoQ: Toggle stream (called Velora Live: … in version 0.2.28 and older). Stream Deck and Touch Portal keys are on the download card.
Account tab
Sign in to Velora / Sign out
Shows who you’re signed in as. Signing in opens your browser.
Copy chat dock link
Puts your chat and activity inside OBS. Click it, then in OBS go to Docks → Custom Browser Docks…, give it a name (like “Velora Chat”), paste, and click Apply. Paste within 5 minutes; after that one time, it stays signed in.
Open in browser instead
Opens the same chat and activity page in your web browser.
Report a problem
Sends us your OBS log and setup details in one click, with a note in your own words if you like. You get a short code (like VR-7K2M-9QX4) to quote in a support ticket.
Video tab
The quality ladder (read-only)
Shows the versions of your video Velora sends (your full quality plus smaller ones for viewers on slower connections), and which encoder is used. The top one follows your OBS Output resolution and frame rate. VELoQ sets its own keyframes and turns off B-frames, so those OBS settings aren’t used.
Quality layers Automatic / Source quality only — 1 layer (lightest) / Up to 2 layers (recommended) / Up to N layers
How many versions of your video your computer encodes at once. More layers = smoother playback for viewers on weak connections, but more work for your GPU. Automatic lets Velora drop the lowest layer on its own if your encoder falls behind, and remembers it next time.
- Default
- A fresh install starts on Up to 2 layers (your full quality plus one smaller version), the safe choice for most PCs. Version 0.2.28 and older put “(recommended)” next to Automatic instead, but still start you on Up to 2 layers.
- Change it when
- Your game stutters or the dock says “dropping frames”: pick 1 layer. A strong PC that wants to serve every viewer: Automatic or more layers. Applies the next time you go live.
Snapshots tab
Snapshot history
Every time you press Save Changes in the Audio Mixer, a copy of your mixer setup is kept. The last 10 are listed with the date, number of sources and groups, and computer name.
Restore
Puts that setup back (after asking). Your current setup is saved as a new snapshot first, so you can undo.
Export / Import Snapshot
Save a snapshot as a file, or load one, to move your mixer setup to another computer. An imported snapshot is added to the list; press Restore on it to use it.
Recipes
Common setups
Just game + mic
Do nothing. Your microphone lands in the Voice group and your desktop or game audio in the Game group, both on Viewers + VOD. Viewers get a slider for each, and both are in your VOD. Optional: rename them to “Mic” and “Game” so the sliders read nicely, then Save Changes.
Game + mic + music you don’t want in your VODs
- Give the music its own source in OBS. This is the important bit: if your music plays through the same Desktop Audio as your game, it’s one sound and can’t be separated. Capture just the music app instead (on Windows, Application Audio Capture; on a Mac, macOS screen capture with app audio; on Linux, PipeWire application capture), and leave the music app out of what your desktop/game capture picks up, so it isn’t captured twice.
- In the Audio Mixer, set the music to Live only with the badge. Named something like “Spotify” or “Music”? It’s probably already Live only.
- Want viewers to be able to turn it down? Use Viewers, not in VOD. Don’t need a slider? No slider, not in VOD.
- Save Changes and go live. Viewers hear the music live; your VOD has game and voice only.
Separate tracks for editing
- Every source with its own slider is its own track. Put the things you’ll want to edit separately (mic, game, guest, music) on a Viewers + … choice and keep them in your top 8.
- Running out of sliders? Combine sources you’d edit together (all your alerts, say) into a Send group. It becomes one track and one slider.
- With Editor+, the Stem box records sources as their own files even when viewers hear them mixed (no-slider sources, sources in a send, sources sharing “Other”). Each costs about 96 kbps of extra upload, and the summary line totals it for you.
- Anything set to Live only is left out of the VOD, so it won’t be there to edit. That’s by design.
When something’s off
Troubleshooting
›Viewers can’t hear anything (or can’t hear one source)
- Check OBS’s own audio mixer first: is the source muted, or its fader all the way down? VELoQ follows OBS.
- Find the source in the Audio Mixer and read its route chip. not sent means it’s set to Not sent; pick another choice.
- silent, skipped means OBS itself isn’t getting sound from it. For a browser source, tick Control audio via OBS in its Properties. For game or window capture, turn on Capture Audio. Hover the chip for the exact reason.
- Viewers hear the main mix by default, and that follows OBS’s Track 1. In OBS, open Edit → Advanced Audio Properties and make sure Track 1 is ticked for every source viewers should hear.
- Changed something while live? Where audio goes applies on your next Go Live. End the stream and go live again.
›Audio sounds robotic, choppy or crackly
- Look at the dock. ● Live · dropping frames means your computer or connection is overloaded. On the Video tab, set Quality layers to Source quality only — 1 layer, and close anything heavy you don’t need.
- Does it sound robotic in your own OBS recording too? Then it’s coming in that way. A common cause is a Bluetooth headset whose mic switches it into a low-quality “hands-free” mode.
- In OBS Settings → Audio, use a Sample Rate of 48 kHz. VELoQ sends audio at 48 kHz, so this avoids an extra conversion.
- Still happening? Use Report a problem on the Account tab right after it happens, so the log covers it.
›Viewers hear an echo, or a sound twice
- The same sound is almost always being captured twice. For example: Desktop Audio and an app capture of the same game, or a browser source with Control audio via OBS on while Desktop Audio also hears your browser.
- Check audio monitoring: in Edit → Advanced Audio Properties, a source on Monitor and Output plays through your speakers, and if Desktop Audio captures those same speakers, it’s sent twice. Use Monitor Off for that source, or monitor through a device Desktop Audio doesn’t capture.
- Your mic picking up your speakers is the other classic: headphones fix it.
›One track is missing (in the viewer mixer or the VOD)
- No slider for it? Check its route chip. Other means you’re past 8 sliders: drag it higher, or combine others into a Send. no slider means it’s set to a No slider choice (still heard, just no slider).
- Missing from the VOD? Its badge probably says Live only. That’s on purpose; click the badge to keep it.
- In a Send group? Its sources share one slider and one track by design. Switch the group to Folder to split them.
- Added the source while you were live? It joins on your next Go Live.
- Using Editor+ and want a separate file anyway? Make sure its Stem box is ticked.
›My changes didn’t stick
- Dropdown and group changes need Save Changes. The summary says “Unsaved changes” until you do.
- Refresh from OBS throws away anything unsaved. Save first.
- Switched OBS profiles? Each profile has its own mixer settings.
- Made a mess? The Snapshots tab has your last 10 saves; Restore one.
›Which version do I have?
- Versions after 0.2.28: it’s at the bottom of the dock, next to ? Help & setup guide, as VELoQ v followed by the number. Click it to copy it for a ticket. It’s also at the bottom of ⚙ Settings → Account, together with your OBS version.
- On OBS 32 or newer, any version: open Tools → Plugin Manager. VELoQ is listed there with its version number.
- Version 0.2.28 and older don’t show it in the dock. If a newer version is out, the update notice in the dock says which one you’re on (“… you’re on 0.2.28”). Otherwise, in OBS open Help → Log Files → View Current Log. The log opens at the bottom, so scroll up toward the top and look for a line like
[velora-live] loading (v0.2.28). Prefer to search? Use Help → Log Files → Show Log Files, open the newest file in a text editor and search forvelora-live. - Still have the installer you downloaded? The version is in its file name, like
VeloraLive-Setup-v0.2.28.exe,VeloraLive-0.2.28.pkgorvelora-live_0.2.28_amd64.deb. - Using Report a problem? It sends us your version automatically, so you don’t need to look it up.
Still stuck? Talk to us
In the dock, open ⚙ Settings → Account → Report a problem and say what happened. You’ll get a code like VR-7K2M-9QX4. Then open a ticket in our Discord’s #open-a-ticket channel, pick Velora OBS Plugin Support, and share the code. That’s all we need to see what you saw.